Android x86 - Installation
1. Download Android-x86 dari Sourceforge
disini
 |
| This will take a while for some, so I recommend doing it first. |
Download dari link resminya
2. Format USBdisk ke FAT32
Tutorial : Untuk tutorialnya bisa baca
disini
3. Download UNetbootin. (
disini)
 |
| Looks straight out of the 90's! |
4. Cari partisi pada menu start dan buka "Membuat dan Format hard drive partisi"
5. Klik kanan drive yang ingin ditempatkan untuk Android Marshmallow dan klik Shrink Volume ...
6. Pilih ukuran drive di MB. 64000 MB yaitu sekitar 64 GB, cukup tambahkan 3 angka nol setelah jumlah gigabyte yang ingin tersedia. Sekarang klik Shrink.
7.
Partisi hard drive telah berhasil dibuat! Sekarang download GParted nya (
disini)
 |
| The name may be different, but it ends in .iso |
8.
Jalankan UNetbootin. Pilih gambar Disk, klik tiga titik dan arahkan ke iso Anda didownload berjudul gparted-live-0.xx.x.x.i686.iso. Pilih USB drive dan klik OK.
Jika ada peringatan, pilih "Yes".
9. Masuk ke Menu Boot. (Jika ragu, baca di bawah)
- Restart Komputer.
- Tekan F12 terus-menerus sampai menampilkan menu perangkat
- Gunakan tombol panah untuk bergerak ke atas dan ke bawah, dan pilih perangkat yang ingin di boot.
- Tekan Enter.
Google how to get to your device's boot menu if this did not work.
10. Gunakan tombol panah untuk menavigasi menu. Pilih flash drive Anda dengan tombol panah dan tekan enter untuk mengkliknya.
 |
| Enter/Return is to click and the arrow keys navigate the menus |
 |
| The name of the flash drive corresponds to the flash drive manufacturer |
 |
| Boot menu on a Lenovo laptop rather than a desktop PC |
11.
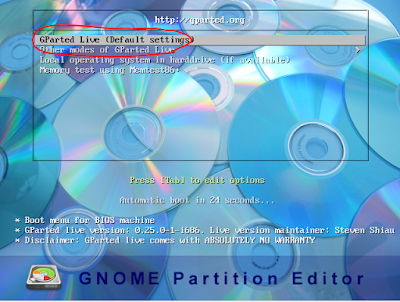
Setelah melihat beberapa teks, menu ini akan muncul. Tekan enter ketika GParted Live dipilih. Jika apa pun muncul, tekan enter sampai jendela terbuka.
12. GParted harus pop-up di window.
 |
I had to go to the GParted menu, Devices, and select the drive I wanted to install Android on.
You should probably not have to do this. |
 |
| On your unallocated partition, right click and then press new. |
 |
| Make sure the file system is ext4, and then press Add. |
 |
| Now press Apply to make the change. |
 |
| Press Apply once again, remove the USB, then reboot. |
13.
Jalankan UNetbootin. Pilih gambar Disk, klik tiga titik dan arahkan ke iso file yang didownload berjudul android-x86-6.0-20151202.iso. Pilih USB drive dan klik OK.
 |
Android should be ready to boot after this!
|
14.Sekali lagi, masuk ke menu boot dan pilih flash drive. UEFI jika memungkinkan.
 |
| Boot menu on a Lenovo laptop rather than a desktop PC |
 |
| The name of the flash drive corresponds to the flash drive manufacturer. |
15. Menu Android-x86 akan muncul!
 |
| Select Installation with your arrow keys and press enter |
 |
| You can choose which system you want to boot into with your arrow keys and enter! |
 |
| Set it up! | |
fitzweekly.com


2 comments
instal sih bisa, tapi wifi jaringan gk bisa konek
bagaimana cara mengaktifkan wifi jaringan,trus kalau pake modem gimana caranya supaya bisa konek ke internet?
EmoticonEmoticon